Next.jsでスナップショットテストをする
こんにちは、 GAOGAO に所属している @kourin と申します。宜しくお願いいたします。 この記事では、Next.js のスナップショットテストについて説明します。
まえがき
Next.js は React 向けに サーバーサイドレンダリング (SSR) や 静的サイト生成(SSG) を可能にするフレームワークで、React を使ったWebアプリ開発プロジェクトで Next.js を使う機会が増えてきています。
React, Next.js で開発していると、コンポーネントの修正時に意図していない別のページの内容まで変化してしまうことがあります。プロジェクトが大規模化するにつれて、共有コンポーネントが増えていき、コンポーネント修正時に変化する部分を補足することが難しくなります。このような場合にスナップショットテストが有効です。スナップショットテストでは、テスト実行時にコンポーネントを構築し、その中身が前回のテスト時と同じかどうかをチェックします。スナップショットテストを行うことで、コンポーネントを修正した際に、その修正がどのコンポーネントに影響を及ぼしているかを容易に確認することができます。
この記事では、Reactのテストで使われている jest や React Testing Library と、Next.js のページをテストで扱えるようにする next-page-tester というライブラリを組み合わせることで、ページ単位でスナップショットテストを行う方法について解説します。
サンプルコードは https://github.com/Kourin1996/next-snapshot-test-sample にあります。
プロジェクト構築
まず、Next.js のプロジェクトとそのテスト環境を構築します。
Next.js + TypeScriptを導入
npx create-next-app コマンドを使って、Next.js のプロジェクトを新規作成します。
npx create-next-app next-snapshot-test-samplenext-snapshot-test-sample というディレクトリが作成され、その中に Next.js のプロジェクトが用意されます。
next-snapshot-test-sample に移動し、TypeScript 関係のパッケージを追加します。
cd next-snapshot-test-sample
touch tsconfig.json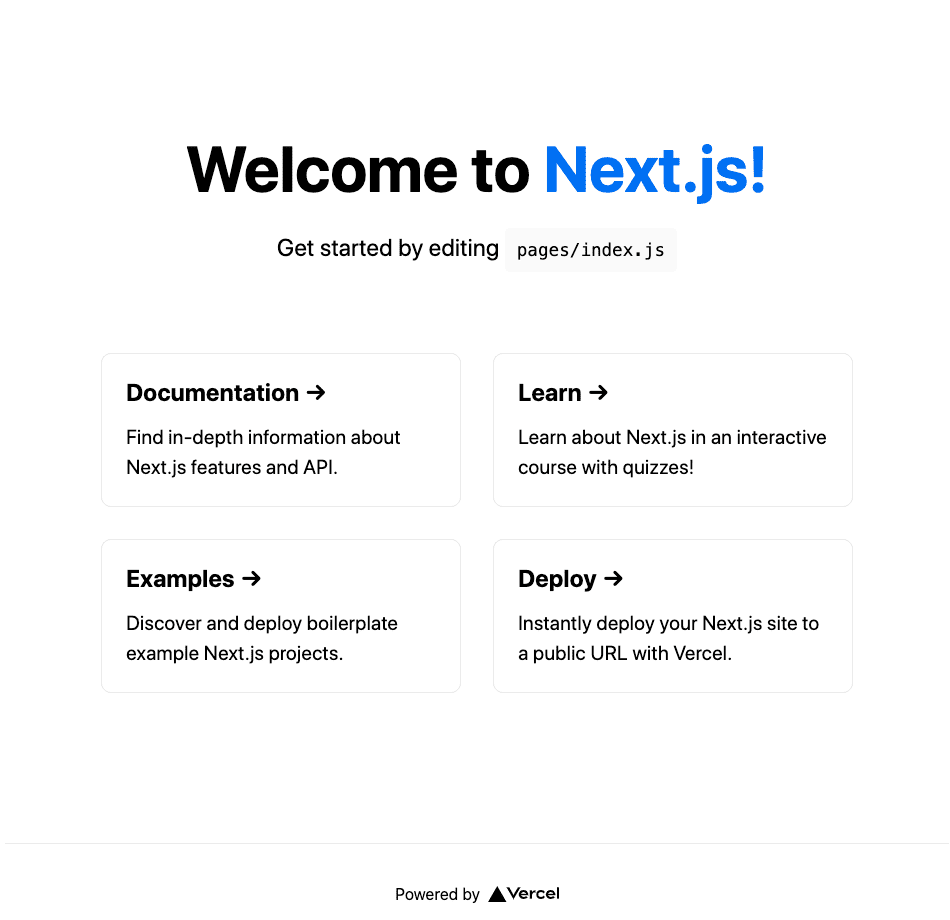
yarn add -D typescript @types/react @types/nodeそして、yarn dev を実行し、ブラウザから http://localhost:3000 にアクセスすると、画像のようなページが表示されます。
yarn dev
next-snapshot-test-sample ディレクトリの中には pages ディレクトリがあり、各ページ用のコンポーネントが置いてあります。
src ディレクトリをプロジェクトルート以下に作り、src/pages, src/styles となるように pages, styles ディレクトリを src ディレクトリの中に移動します。
テスト環境導入
次に、テスト環境を導入します。必要なパッケージを追加します。
yarn add -D jest jest-dom @testing-library/react @testing-library/jest-dom @testing-library/dom babel-jest identity-obj-proxy react-test-renderer fetch-mock ts-jest @types/jest @types/react-test-renderer @types/fetch-mocksetupTests.js を next-snapshot-test-sample 直下に作り、以下を記述します。
import "@testing-library/jest-dom/extend-expect";テスト環境で React,Next.js のコンポーネントや TypeScript のコードを動かすために、JavaScriptへのトランスパイラである Babel の設定をします。 .babelrc を next-snapshot-test-sample 直下に作り、以下を記述します。
{
  "presets": ["next/babel"]
}
jest.config.js を next-snapshot-test-sample 直下に作り、以下を記述します。
module.exports = {
  testPathIgnorePatterns: ["<rootDir>/.next/", "<rootDir>/node_modules/"],
  setupFilesAfterEnv: ["<rootDir>/setupTests.js"],
  transform: {
    "^.+\\.(js|jsx|ts|tsx)$": "<rootDir>/node_modules/babel-jest",
  },
  moduleNameMapper: {
    "\\.(css|less)$": "identity-obj-proxy",
  },
};
package.json の scripts にテスト用のスクリプトを追加します。
{
...
"scripts": {
...
"test": "jest"
},
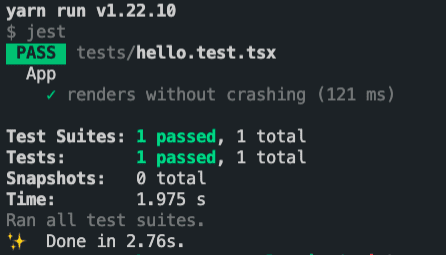
}試しに簡単なテストを実行してみます。
src/tests ディレクトリを作り、その中にhello.test.tsx を作成し、以下を記述します。
このテストは、src/pages/index.tsx で定義されているコンポーネントに、Welcome to Next.js! という内容が含まれていたらテストが成功します。
import { render, screen } from "@testing-library/react";
import App from "../pages/index";

describe("App", () => {
  it("renders without crashing", () => {
    render(<App />);
    expect(
      screen.getByRole("heading", { name: "Welcome to Next.js!" })
    ).toBeInTheDocument();
  });
});
yarn test を実行すると、テストが実行されます。 PASS と表示され、テストが成功します。
yarn test
next-page-tester 導入
次に、Next.js のページをテストで扱えるようにするためのライブラリである next-page-tester を導入します。
パッケージを追加します。
yarn add -D next-page-testersetupTests.js を修正して、以下のようにコードを追記します。
import "@testing-library/jest-dom/extend-expect";
// 以下を追記
import { initTestHelpers } from 'next-page-tester';
initTestHelpers();
src/tests/index.test.tsx を以下のように修正します。
import { getPage } from "next-page-tester";
import { render, screen } from "@testing-library/react";

describe("index page", () => {
  test('should have "Welcome to"', async () => {
    const { render } = await getPage({
      route: "/",
    });

    render();
    expect(screen.getByText("Welcome to")).toBeInTheDocument();
  });
});
yarn test を実行し、テストが成功したらnext-page-tester の導入は完了です。
yarn testnext-page-tester 使い方
next-page-tester の簡単な使い方について説明します。
import { getPage } from "next-page-tester";
import { screen } from "@testing-library/react";

describe("Index page", () => {
  test("renders index page", async () => {
    const { page, render } = await getPage({
      route: "/",
    });

    render();
    expect(screen.getByText("Welcome to")).toBeInTheDocument();
  });
});
next-page-tester は src/pages 以下にあるページコンポーネントをテストで扱えるようにします。これらのコンポーネントでは, ファイル中に getServerSideProps 関数を定義することができます。この関数はサーバサイドで実行され、その結果が props としてコンポーネントに渡されます。next-page-tester は、テスト中に getServerSideProps を実行し、結果をコンポーネントに渡した上でテストが実行されます。
next-page-tester を使う際は、getPage 関数を呼び出します。引数の route にはテストしたいページのパスを指定します。上のテストの場合は、パスが / のページである src/pages/index.tsx のテストを行っています。
getPage 関数は page や render を返します。page はページの Reactコンポーネントを返し、render は実行するとページの JSDOM を返します。
getServerSideProps 内で fetch を使って外部からデータを取得している場合には、テスト環境では fetch 関数が未定義で、エラーが発生しテストが失敗してしまいます。 そのため、 fetch-mock を使って fetch 関数のモックを作ります。以下は fetch-mock を使ったテストコードのサンプルです。
import { getPage } from "next-page-tester";
import { screen } from "@testing-library/react";
import fetchMock from "fetch-mock"

describe("Index page", () => {
  beforeAll(() => {
    fetchMock.get("http://sample.hoge", { "name": "sample" })
  })

  test("renders index page", async () => {
    const { page, render } = await getPage({
      route: "/",
    });

    render();
    expect(screen.getByText("Welcome to")).toBeInTheDocument();
  });
});
import React from "react"
const IndexPage: React.Page<{ name: string }> = (props) => {
const { name } = props;
return (
<div>
{`Welcome to ${name}`}
</div>
);
}
export const getServerSideProps = async () => {
const res = await fetch("https://sample.hoge")
.then((res) => res.json());
return { props: res };
};
export default Index;fetch-mock では、URLとそのURLが返すデータを渡します。サンプルコードでは、テスト中に http://sample.hoge というURLで fetch が呼ばれた場合に {"name":"sample"} というデータを返すように設定します。このようにすることで、 getServerSideProps の中で fetch('http://sample.hoge') が呼ばれた場合は {"name":"sample"} というデータを得ることができます。
next-page-tester を使ったページのスナップショットテスト
それでは実際のコードを用いて、スナップショットテストの解説をしていきます。
作成するページ
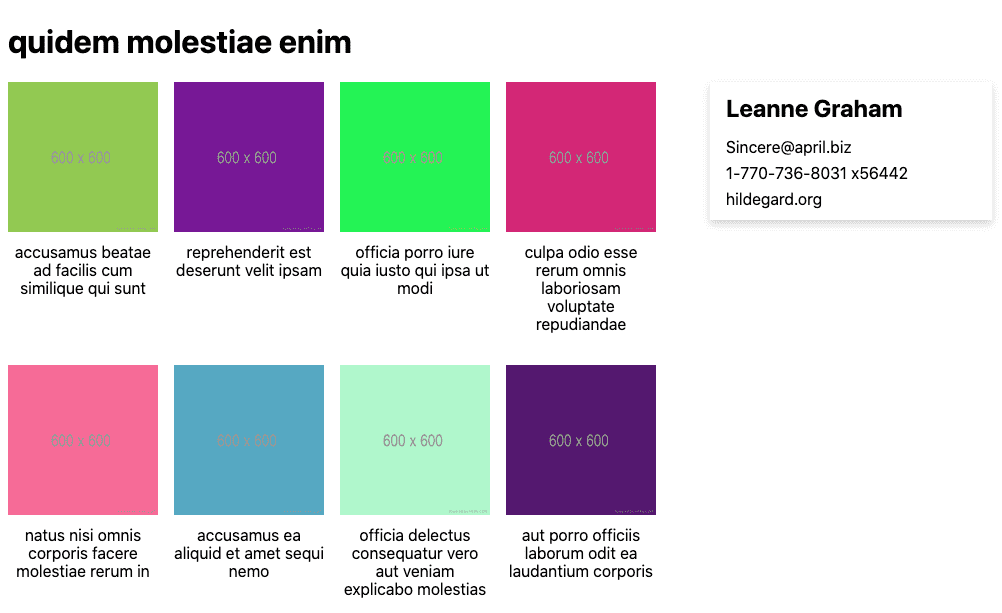
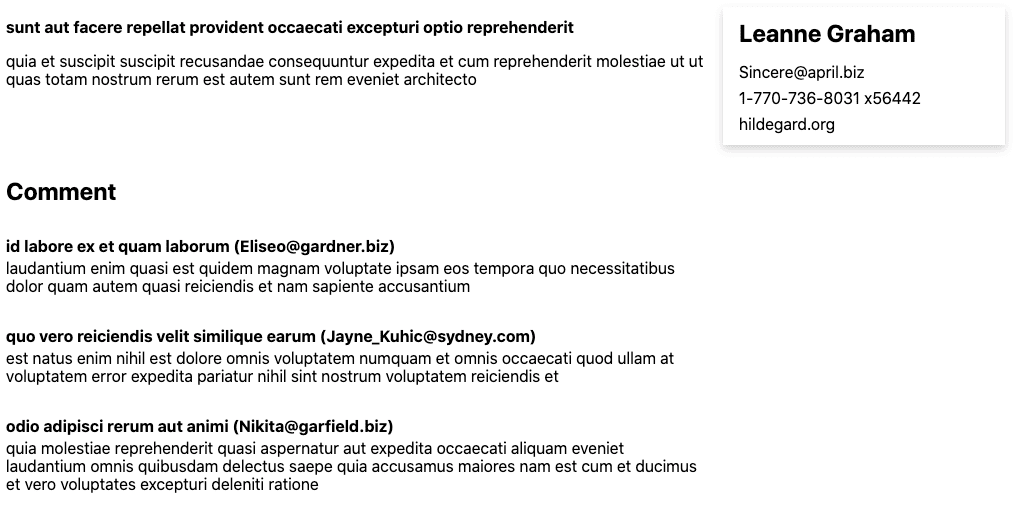
今回は、2種類のページ /album/[id] と /post/[id] を作ります。各ページに表示される内容は、以下の画像の通りになっています。
album では、パスで与えられたIDのアルバムのデータを取得し、タイトルと作成者情報、そしてアルバムに含まれる画像を表示します。
post では、指定したIDの投稿データを取得し、タイトル、本文、投稿者情報、そして投稿に対するコメントを表示します。
album と post では、作成者の情報を表示するコンポーネントが共通となっています。(スクリーンショットの右側のコンポーネント)
表示するデータは、ダミーデータを返す https://jsonplaceholder.typicode.com/ という既存のAPIから取得します。
各ページの実装
album, post ページ用のコンポーネントとユーザ情報を表示する共通のUIコンポーネントを追加します。
src/pages/album/[id].tsx を作成し、以下を記述します。
import React from "react";
import { GetServerSideProps, NextPage } from "next";
import { User, Album, Photo } from "../../domain";
import { UserCard } from "../../components/UserCard";

type AlbumPageProps = {
  user: User;
  album: Album;
  photos: Photo[];
};

const AlbumPage: NextPage<AlbumPageProps> = (props) => {
  const { user, album, photos } = props;

  return (
    <div className="album__page">
      <h1>{album.title}</h1>
      <div className="album__body">
        <div className="album__body__list">
          {photos.map((photo) => {
            const { id, title, url } = photo;
            return (
              <div key={id} className="album__body__list__item">
                <img alt={title} src={url} className="album__body__list__item__image" />
                <p className="album__body__list__item__title">{title}</p>
              </div>
            );
          })}
        </div>
        <div className="album__body__author">
          <UserCard user={user} />
        </div>
      </div>
    </div>
  );
};

export const getServerSideProps: GetServerSideProps<AlbumPageProps> = async (
  context
) => {
  const id = Array.isArray(context.params["id"])
    ? context.params["id"][0]
    : context.params["id"];

  const [album, photos] = await Promise.all([
    fetch(`https://jsonplaceholder.typicode.com/albums/${id}`)
      .then((res) => res.json())
      .then(
        (data): Album => {
          if (Object.keys(data).length === 0) {
            throw new Error("Not Found");
          }
          return data;
        }
      ),
    fetch(`https://jsonplaceholder.typicode.com/albums/${id}/photos`)
      .then((res) => res.json())
      .catch(() => []),
  ]);
  const user = await fetch(
    `https://jsonplaceholder.typicode.com/users/${album.userId}`
  ).then((res) => res.json());

  return {
    props: {
      user,
      album,
      photos,
    },
  };
};

export default AlbumPage;
次に src/pages/post/[id].tsx を作成し、以下を記述します。
import React from "react";
import { GetServerSideProps, NextPage } from "next";
import { User, Post, Comment } from "../../domain";
import { UserCard } from "../../components/UserCard";

type PostPageProps = {
  user: User;
  post: Post;
  comments: Comment[];
};

const PostPage: NextPage<PostPageProps> = (props) => {
  const { user, post, comments } = props;

  return (
    <div className="post__page">
      <div className="post__main">
        <div className="post__contents">
          <h1 className="post__main__post__title">{post.title}</h1>
          <p>{post.body}</p>
        </div>
        <div className="post__main__author">
          <UserCard user={user} />
        </div>
      </div>
      <div className="post__comments">
        <h2 className="post__comments__title">Comment</h2>
        {comments.map((comment) => {
          const { id, name, email, body } = comment;

          return (
            <div key={id} className="post__comments__comment">
              <p className="post__comments__comment__header">{`${name} (${email})`}</p>
              <p className="post__comments__comment__content">{body}</p>
            </div>
          );
        })}
      </div>
    </div>
  );
};

export const getServerSideProps: GetServerSideProps<PostPageProps> = async (
  context
) => {
  const id = Array.isArray(context.params["id"])
    ? context.params["id"][0]
    : context.params["id"];

  const [post, comments] = await Promise.all([
    fetch(`https://jsonplaceholder.typicode.com/posts/${id}`)
      .then((res) => res.json())
      .then((data) => {
        if (Object.keys(data).length === 0) {
          throw new Error("Not Found");
        }
        return data;
      }),
    fetch(`https://jsonplaceholder.typicode.com/posts/${id}/comments`)
      .then((res) => res.json())
      .catch(() => []),
  ]);
  const user = await fetch(
    `https://jsonplaceholder.typicode.com/users/${post.userId}`
  ).then((res) => res.json());

  return {
    props: {
      user,
      post,
      comments,
    },
  };
};

export default PostPage;
最後に album ページと post ページの両方で使用している、UserCard コンポーネントを追加します。
src/components/UserCard/index.tsx を作成し、以下を記述します。
import React from "react";
import { User } from "../../domain";

type UserCardProps = React.HTMLAttributes<HTMLDivElement> & {
  children?: never;
  user: User;
};

export const UserCard: React.FC<UserCardProps> = (props) => {
  const { user } = props;

  return (
    <div className="user-card">
      <p className="user-card__name">{user.name}</p>
      <p className="user-card__email">{user.email}</p>
      <p className="user-card__phone">{user.phone}</p>
      <p className="user-card__website">{user.website}</p>
    </div>
  );
};
スナップショットテストを追加
次に album ページのスナップショットテストをするために、テストを追加します。
src/tests/album/index.test.tsx を追加し、以下を記述します
import { getPage } from "next-page-tester";
import fetchMock from "fetch-mock";
import renderer from "react-test-renderer";

describe("album page", () => {
  beforeAll(() => {
    fetchMock
      .get("https://jsonplaceholder.typicode.com/albums/1", {
        id: 1,
        userId: 1,
        title: "Test Title",
      })
      .get("https://jsonplaceholder.typicode.com/albums/1/photos", [
        {
          id: 1,
          albumId: 1,
          title: "Test Photo",
          url: "/test.png",
          thumbnailUrl: "/test-thumbnail.png",
        },
        {
          id: 2,
          albumId: 1,
          title: "Test Photo2",
          url: "/test-2.png",
          thumbnailUrl: "/test-thumbnail-2.png",
        },
      ])
      .get("https://jsonplaceholder.typicode.com/users/1", {
        id: 1,
        name: "Adam",
        username: "adam1980",
        email: "adam@hoge.org",
        address: {
          street: "Kulas Light",
          suite: "Apt. 556",
          city: "Gwenborough",
          zipcode: "92998-3874",
          geo: {
            lat: "-37.3159",
            lng: "81.1496",
          },
        },
        phone: "1-770-736-8031 x56442",
        website: "adam.org",
        company: {
          name: "Test-Company",
          catchPhrase: "Next generation platform",
          bs: "photo",
        },
      });
  });

  test("should render correctly", async () => {
    const { page } = await getPage({
      route: "/album/1",
    });

    const tree = renderer.create(page).toJSON();
    expect(tree).toMatchSnapshot();
  });
});上のテストでは、/album/1 にアクセスした時のページに関して、スナップショットテストを行います。前回のテスト実行時と同じ内容が表示される場合はテストが成功します。(初回の場合、前回の結果が無いため必ず成功します)
また、beforeAll の中で fetch 関数のモックを設定し、 getServerSideProps で fetch が呼ばれた場合、URLに対応するダミーデータを返すように設定します。
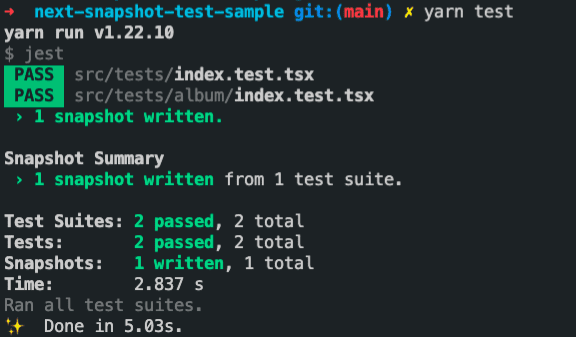
yarn test を実行してみると、以下のような結果が得られます。
初回のスナップショットテストなので、テストは成功し 1 snapshot written と表示されます。スナップショットテストをすると、テストのファイルと同じ階層に __snapshots__ ディレクトリが自動で作成されます。このディレクトリの中には、次回のスナップショットテストで使うスナップショットのデータが入っているため、gitなどのバージョン管理システムの監視対象として追加します。
UIコンポーネントの修正とスナップショットテストの実行
次に、post ページに表示されている作成者情報に、ユーザの企業情報も表示するように修正します。

src/components/UserCard/index.tsx を修正します。
import React from "react";
import { User } from "../../domain";

type UserCardProps = React.HTMLAttributes<HTMLDivElement> & {
  children?: never;
  user: User;
};

export const UserCard: React.FC<UserCardProps> = (props) => {
  const { user } = props;

  return (
    <div className="user-card">
      <p className="user-card__name">{user.name}</p>
      <p className="user-card__email">{user.email}</p>
      <p className="user-card__phone">{user.phone}</p>
      <p className="user-card__website">{user.website}</p>
      <div className="user-card__company">
        <p className="user-card__company__title">Company Info</p>
        <p className="user-card__company__name">{user.company.name}</p>
        <p className="user-card__company__catch-phrase">
          {user.company.catchPhrase}
        </p>
      </div>
    </div>
  );
};
UserCard は、album ページでも使用しているコンポーネントのため、この修正により album ページの内容も変化してしまいます。そのため、yarn test でテストを再度行うと、以下のようにテストが失敗します。
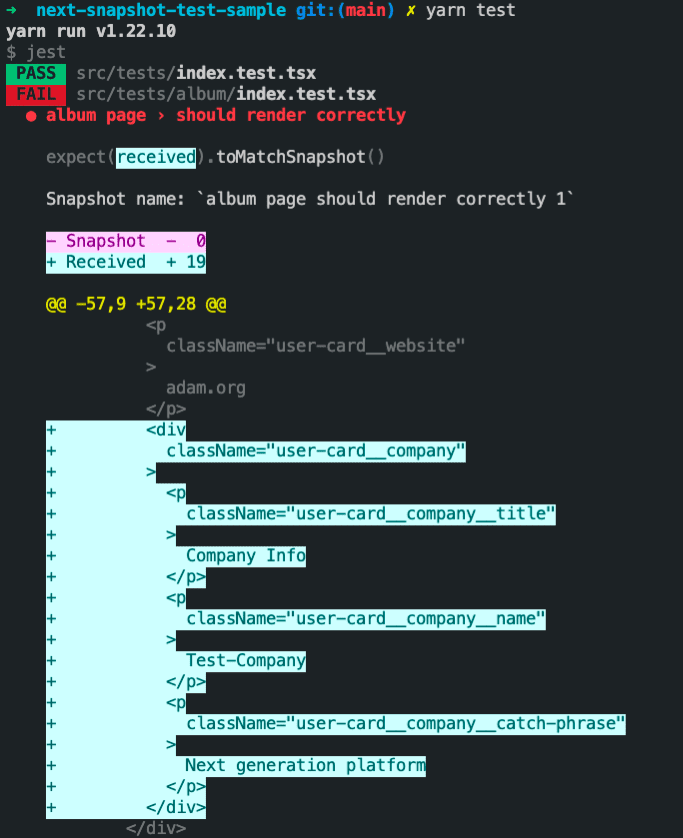
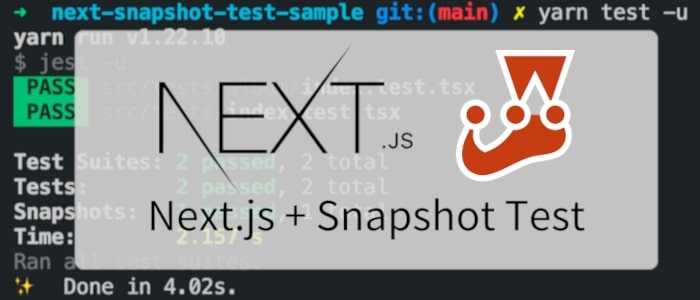
テストの結果を見ると、ハイライトされている部分が企業情報の部分となっており、新たに追加した部分と対応していることが分かります。このように、コンポーネントを修正した事で、ページが前回のテストから変化したことが分かります。もしこの変化が意図するものであれば、yarn test -u を実行することで、スナップショットを更新することができます。
まとめ
jest, React Testing Libray, next-page-tester を組み合わせることで、 Next.js のプロジェクトで getServerSideProps の実行も含めてページ単位でテストを行うことができます。スナップショットテストをページ単位で行うことで、コンポーネントの修正がどのページに影響を及ぼすかを容易に補足することができ、意図しない変化を防ぐことができるようになります。
最後に
弊社 GAOGAO は現在副業含めて40名以上のエンジニアの方が参画し、グローバル(シンガポール、バンコク、US、日本など)で20社以上お客様の開発のお手伝いをさせていただいております。
もしグローバルにお仕事をしたいというエンジニアの方(デザイナーの方も)いましたら、お気軽に @tejitak までご連絡いただければ幸いです。